|
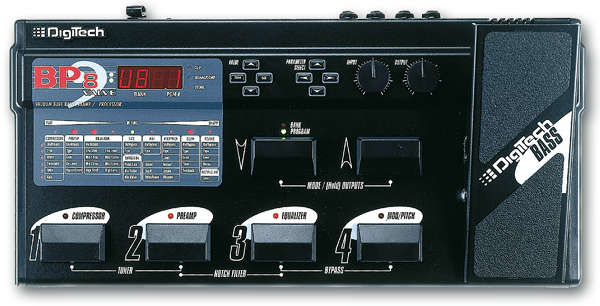 |
Digitech BP8 Valve 60 Patches for Digitech BP8 from the old Digitech.com Patch library Download here (PDF) |
Bedienungsanleitung: Deutsch (unvollständig) Manual: English (complete) | |
Bass-Multieffekt•
Groove tube 12AX7 tube and solid-state preamps | BP8 FAQ-------------------------------------------------------------------------------- A: Yes, for the most part if you have ever used an RP6/RP7 you will feel right at home with the BP8.
Q: Is the BP8 really just an RP7 with a few tweaks? A: Not at all...the entire circuit board was redesigned with the bass player in mind. The compressor for example was completely redesigned because the requirments of the bass player are completely different than the guitar player. Likewise the PreAmp and tube sections were redone according to the needs of the bass...not the guitar.
Q: How do I change the assignment for the expression pedal? A: The expression pedal on the BP8 can only control one parameter at a time. Changing the assignment is a very easy process. Follow these steps to change the parameter assigned to the expression pedal. 1. Select the
preset that you want to change the assignment on (with the value up/down buttons,
or footswitches). The red display will now show "CC and a number between 1 and 8" . At this point you need to decide which of the assignable parameters you want to assign. You will notice that on the matrix, there are 8 different parameters that are followed by a CC number in parenthesis. This is the number that corresponds to the expression pedal controlling that parameter. 5. Use the "value" up/down buttons to change the CC number in the red display to reflect the CC number in the parenthesis following the parameter you want to assign. For instance, if you want the expression pedal to be a wah, you would select CC 2. If you want the expression pedal to control the reverb level, you would select CC 8. 6. Press the store button twice to save the change to the preset.
Q: How do I copy one preset to another preset location? A: The following steps will copy one preset to another location. 1. Select the preset that you
want to make a copy of (using the value up/down buttons, or a footswitch).
Q: How do I assign my favorite presets to a particular footswitch. A: The footswitch assignments on the BP8 cannot be changed. However, you can assign your presets to the switches, but not the switches to the presets. To assign the presets to the switches, you would just use the copy feature in the previous Q & A. For example, if you wanted to have the #1 switch call up the sound in preset #44, and your number #2 switch call up the sound in preset #82, you would copy preset 44 to the "U01" location, and copy preset #82 to the "U02 location. Now when you are in the "U-0" bank, the number one switch will have the sound of 44 at the number 1 switch, and the sound of 82 at the number 2 switch. Although the display will not show the actual preset numbers of 44 or 82, the sounds will be the same because you have copied presets 44 and 82 to new locations.
Q: How do I restore one preset only, to its original form? A: You will notice that when the BP8 factory, and user presets were exact duplicates of each other when the unit was first taken out of the box. In other words, presets "U01" through "U94" are exact copies of presets "F01" through "F94". So, to restore just one of your user presets to it's original form, just select the factory equivalent (F72 if you're trying to restore U72), and copy it to the user location.
Q: How do I reset the entire BP8 to the factory programs? A: Note: this will erase and reset all programs
to their original factory settings! To reinitialize the BP8, disconnect the power,
press and hold the "parameter up" arrow while you reconnect the power.
After about 2 seconds, release the parameter up button, and press the "value
up" button once. This will reset the entire unit. |
|
| |